 Motion Tasks
Overview
The AKD offers several options for executing moves, which are called "motion tasks" in WorkBench. You can directly link an input to a single motion task, assign inputs as a BCD pointer and execute, command over the Ethernet connection, or automatically execute a motion task as the result of the completion of another move event. Using the Motion Task view, you can also set up a single motion task or a sequence of motion tasks through the Motion Task screen, which is accessed from the Settings view. The Motion Task view allows you to modify a variety of parameters for a given move, including move profile, move type, velocity, distance, and acceleration limits.
-
-
Motion Tasking is not supported by AKD SynqNet.
Motion Task Input Table
Motion tasks can be easily entered and manipulated using the Motion Task Table. With this table, you can enter specific motion tasks and edit tasks, as well as insert and delete tasks, much like an Excel spreadsheet. The data table you build remains in WorkBench until you load the tasks into the drive. Once the tasks are loaded, you have access to the graphical representation of the moves (as in previous versions of WorkBench).
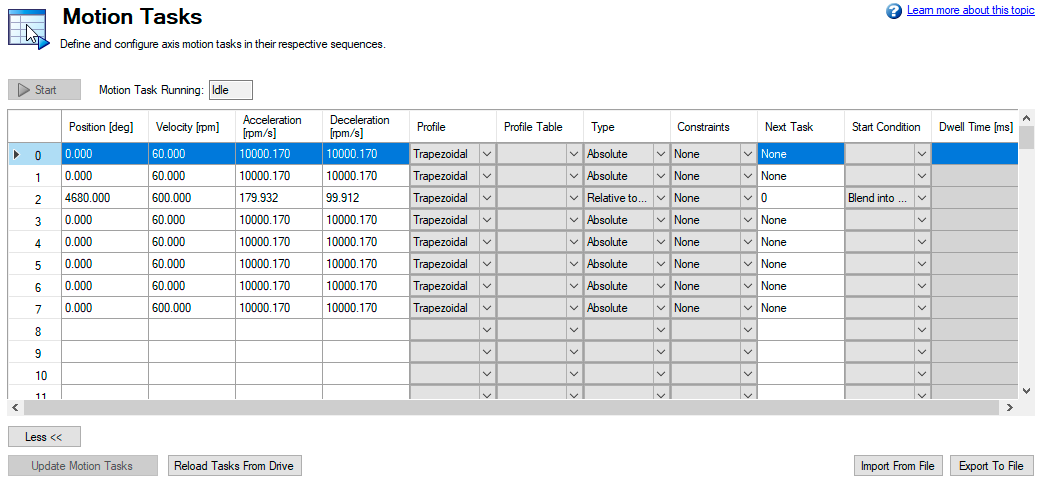
Enter values in each column for each task that you require. Once you enter an item, that field will change color indicating it has been edited but not yet loaded to the drive. Continue entering your tasks row by row. If you find that you skipped a task, you can easily insert it before or after a row that you highlight, and right-click to open the menu options. You can also select a task and using the right click access the copy and paste commands.
For delays and motion blends, double click on the line you want to edit and the delay and blend options will be available to adjust. You must load any changes or modifications to the drive before they will be available for use.
Using Motion Tasks
Use the Motion Task view to create and execute new motion tasks within WorkBench. As you add motion tasks, the new tasks appear as branches. You can use the root Motion Task view to view all tasks at once and execute individual tasks. When you select the Motion Task view, the Motion Task table is opened, as shown below.
From this view, you can perform the following actions:
| Button or Dialog Box | Description |
|---|---|
|
Start |
By highlighting an existing motion task, you can use this button to initiate that task (and subsequent tasks it may be linked to). In order to start any Motion Task, the motor must have been homed. |
|
More/Less |
This expands the Task table to include additional information regarding each task. |
|
Save Motion Tasks To Drive |
Saves the motion tasks in the table to the drive. This field is highlighted in pink if any values in the table have changed and have not been saved to the drive |
|
Reload Tasks From Drive |
Uploads motion tasks table with current values from the drive. This action deletes any values listed in the table. |
|
Import From file |
Allows import of a .xml file to the task table. |
|
Export To File |
Exports to a .xml file the current list of tasks in the table. |
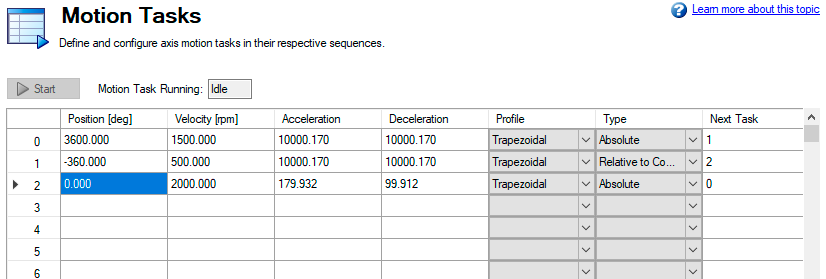
All of the task parameters can be added to the Motion Tasks Table when More is selected. You can also view individual tasks in the Motion Task (Edit Single Task) screen by double-clicking on the task row.
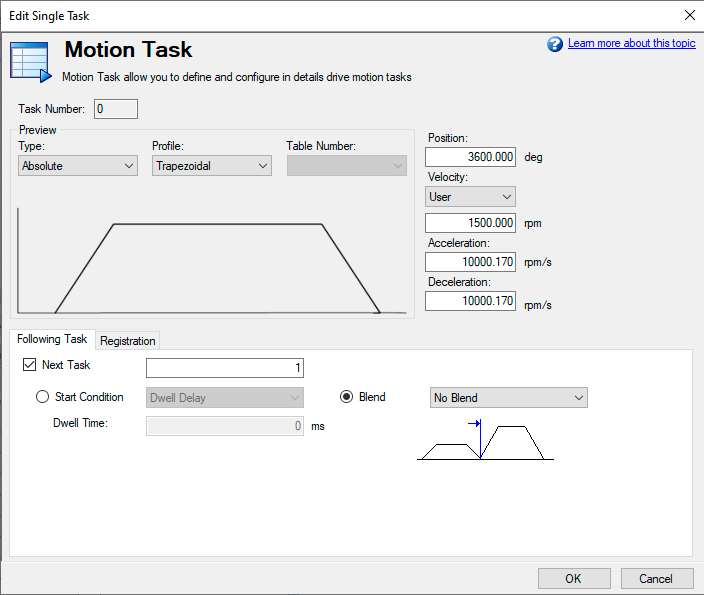
Once in the edit screen, you can adjust move type, position command, velocity and accelerations as well as sequencing options. The editable fields include:
-
Type: Sets the type of move, absolute or incremental type moves.
- Profile : This area sets the basic shape of the move. The basic move is trapezoidal, but S-curve (1:1) and custom profiles are also available using a "Profile Table".
- Position: This is the command position (PL.CMD), based on the type of move selected.
- Velocity: Sets the peak or traverse velocity depending on the move parameters
- Acceleration: Sets the profile acceleration ramp (this cannot be set higher then the drive acceleration limit setting - DRV.ACC)
- Deceleration: Sets the profile deceleration ramp (this cannot be set higher then the drive deceleration limit setting - DRV.DEC)
In addition to these profile settings, you can set additional parameters on how your next move will be executed. These parameters include:
-
Following Task: By checking this box, you can indicate which task you want to follow the task that you are editing.

-
Start Condition: This box allows for different start conditions to initiate the following task. Currently, the only option is a dwell delay. The dwell delay time can be entered in the dwell time box.
-
Blend: It is possible to blend moves together by using the blend option. This option allows either a blend to velocity, or blend to acceleration.
Once you have entered the data, you can click on the Motion Task root directory to bring the table up to execute your moves. For more advanced motion tasks, specific constraints can be added. Currently, you can have a task that is either an interrupt task, or non-interruptible.
Advanced: Constraints
- Interrupt: This constraint can be used to interrupt a task that has not been finished. In other words, this constraint only will initiate the interrupt task motion if another task with no constraints is underway. This selection is a good option for registration tasks when you only want the move to happen if the current task has not finished.
- Non-Interruptible: When this constraint is selected, then the task can not be interrupted by another motion task or task call from inputs.
Motion Profiles
Trapezoidal moves include a fixed ramped acceleration set by MT.ACC, a traverse period at velocity set by MT.VEL, and a fixed ramped deceleration set by MT.DEC. The distance traveled during the move is determined by the type of move (absolute or incremental). Position is set using MT.P. Note that for short moves, the traverse velocity may not ever be reached.
OneToOne and Profile Table moves use a lookup table (see the section on Motion Profile Table) for the acceleration and deceleration profiles. OneToOne profiles use the table throughout the entire move by interpolating the table at each sample to determine the command position of the move. Profile Table moves split the table and use the first half for acceleration and the second half for deceleration with constant velocity (if the move is long enough to reach the maximum velocity) in between. Tables used for One-To-One moves do not need to be symmetric so they may not work with Profile Table moves which require symmetric tables.
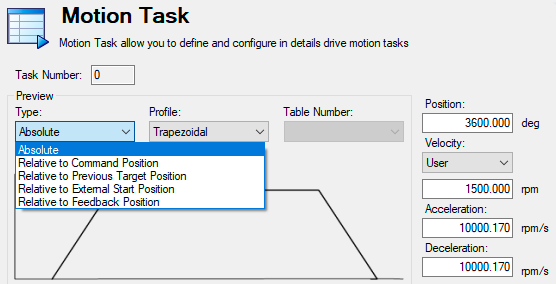
Motion Types
Motion tasks can use the following motion types:
- Absolute
- Relative to command position (PL.CMD)
- Relative to previous target position
- Relative to external start position
- Relative to feedback position
Motion types define how the target position will be calculated. These can be either incremental (relative) or absolute. An incremental move is a move that increments a specific distance. The AKD allows the user to increment based on two different beginning positions as described below. Absolute moves move to a specific position based the actual position form an established zero or home point.
Absolute motion task
An absolute move type will move to the actual position indicated by MT.P. A home move would have been established to provide the reference for actual positions on the machine. In this case, the target position = PL.CMD=MT.P
Example:
You want to move to a position that is 68 degrees from home reference.
On the Motion Task edit page, Select the Absolute move type, and then enter 68 into the position block (units should be set in degrees). Enter the traverse speed and adjust the acceleration and deceleration parameters as needed. Once you move off the edit screen you can select this task and initiate a start. Regardless of your current position, the motor will now rotate to the absolute position of 68 degrees as referenced from the home position.
Motion task relative to command position (PL.CMD)
This type is simply an incremental move. The target position is based on the current position represented by PL.CMD plus the increment you want to move. Specifically, Target Position = PL.CMD + MT.P.
Example:
Your current motor position at the time you activate the motion task is 38 degrees. You want to move an increment of 30 degrees.
On the Motion Task edit page, select the Relative to Command Position move type, and then enter 30 into the position block (units should be set in degrees). Enter the traverse speed and adjust the acceleration and deceleration parameters as needed. Once you move off the edit screen you can select this task and initiate a start. The motor will move 30 degrees form the current position. After the motion task, the motor will now be at 68 degrees (38 + 30 = 68).
Motion task relative to previous target position
Using the last target position as the start point, this profile will move the increment chosen from that old position. This motion type is recommended in situations where a previous task may have been interrupted, or you want to eliminate any accumulated error. The target position will look at the previous target position and then add the increment you enter for this task. Specifically, Target Position = Previous Target Position + MT.P.
Example:
You initiated a motion task to increment 360 degrees, but that task was interrupted and the motor was stopped at 175 degrees. You use this method and increment another 360 degrees, the motor will complete the motion at 720 degrees (basically, it finished the first move to 360, and then made the additional distance requested of 360 degrees).
The task would be set up similar to the Relative command position example above. To view this in action, set up 2 tasks, once Relative Command Position and the second, Relative Old Target Position. Use low velocities so you can stop motion before the move is completed. Start the first move and then stop before it finishes. Then select the second move. The motor will stop at the desired end position if the stop had not occured. Try this again, but do not use the Relative Old Target Position and you will see the difference.
Using Motion Tasks: Advanced
Joining multiple tasks
Tasks can be joined in sequence using the task setup screen. Dwells can be added to allow the following tasks to wait a specific amount of time before starting. Tasks can also be blended to provide for smoother transitions between multiple moves. AKD allows blending with either acceleration or velocity.
Start Conditions
AKD currently provides only one alternatives to start a following task at this time:
- Dwell Delay. Starts the following task after the dwell time entered (MT.FTIME)
Blending
As an alternative to dwells, the AKD can blend motion tasks to provide smooth transitions between multiple tasks. This feature extends the life of your machine life by minimizing mechanical wear due to hard move transitions (jerks).
- No blend. No blend, move starts upon completion of the previous task
- Blend into Acceleration. Blends the acceleration of the current task into the following task. As the target position of the first task is reached, the acceleration blends into the second task. This prevents the motor from decelerating to zero before starting the second move. This only works where both accelerations are driving the motor in the same direction.
- Blend into Velocity. Blends the velocity of the current task into the following task. In this method, the target position is reached as the velocity of the second move is reached. The blending begins prior to reaching the target position, and is completed at the target position of the first move, and the traverse velocity of the second move. This only works when both velocities are in the same direction.
Related Parameters and Commands
DRV.MOTIONSTAT: Bit 0 monitors if motion tasking is active.


